Pedicle screw placement method
1. The entry point: the neck, chest and waist are different;
2. Grasp the horizontal plane angle (TSA) and sagittal plane angle (SSA) of the screw entry: The TSA angle can be measured from the CT film. The SSA has a certain relationship with the body position, and can be controlled with the C-arm during the operation.
3. Depth: The length of the screw reaches 80% of the length of the pedicle axis to obtain sufficient biomechanical strength, and it is easy to penetrate the cortical bone and damage the blood vessels if it is too long.
4. Length: from the needle insertion point to 83% of the total length of the anterior cortex of the vertebral body.
![b]()
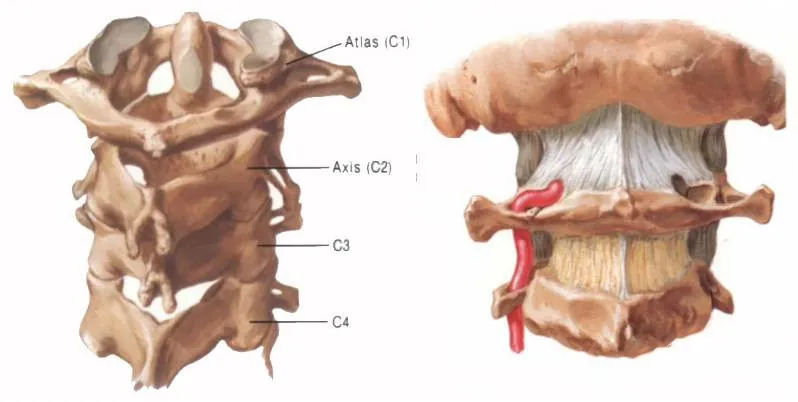
Cervical Spine
Cervical pedicle screw insertion method
Needle insertion method
At present, the main methods of needle insertion are: Abumi method, anatomical landmark positioning method, computer-aided imaging positioning method, etc.
cervical spine entry point
At the intersection of 5mm below the horizontal line of the upper edge of the lamina of the C2 axis and 7mm outside the medial edge of the spinal canal.
C3-C6 The intersection of the upper middle 1/4 horizontal line and the middle outer 1/4 vertical line on the back of the side block.
C7 The intersection of the vertical midline of the lateral block and the upper middle 1/4 horizontal line is above.
Cervical vertebra screwing angle
C2 incline 20-25° incline 10-15°
C3-C6 incline 40-45°, the horizontal plane is parallel to the upper and lower endplates
C7 inclination 30-40°, the horizontal plane is parallel to the upper and lower endplates
Cervical spine screw
If the height of the posterior arch of the atlas is less than 4mm, it is changed to a lateral mass screw.
If the height or width of the pedicle of the axis is less than 5mm, it is recommended to change to lateral mass screw fixation.
Cervical lateral mass screw placement
Magerl's method: The screw entry point is located 1-2mm above the midpoint of the posterior wall of the lateral mass; the screw entry direction is 25-30° laterally inclined, and the head is tilted 30° (parallel to the upper articular surface), and the contralateral cortex is drilled; depth measurement After screwing in 3.5mm cortical bone screws.
![C_副本]()
Roy-Camille method: the screw entry point is located in the center of the back of the lateral mass; the screw entry direction is 10° laterally, the vertical posterior cortex is drilled, and the contralateral cortex is drilled; after sounding, a 3.5mm cortical bone screw is screwed in.
Anderson's method: The screw entry point is located 1mm inside the center of the lateral mass, the screw entry direction is 20° laterally, and the head is tilted 20° to 30° to drill the hole, and the contralateral cortex is drilled.
Experience summary
(1) Special attention should be paid to the safety of screw implantation. The surgeon should choose the appropriate method according to the mastery of cervical anatomy and pedicle screw technique.
(2) The lateral mass screw fixation in the C3-C6 segment is simpler and safer than the pedicle screw fixation.
(3) The tool cannot penetrate the outer wall of the pedicle, otherwise it will damage the adjacent nerves and blood vessels.
(4) The angle of screw insertion should vary with the angle of the vertebral arch.
(5) Penetration of the cortical bone in front of the vertebral body should be avoided.
(6) Intraoperative fluoroscopy can accurately locate the vertebral body and intervertebral space, and accurately implant screws to prevent screwing into the intervertebral space and spinal canal.
Thoracic
Needle entry point:
1. Margel and Roy Camille took the intersection of the horizontal line of the midpoint of the transverse process and the vertical line of the outer edge of the superior articular process as the entry point.
2. Ebraheim proposed that the center of the pedicle of T1-T2 is located 7-8 mm within the outer edge of the superior articular process, and 3-4 mm on the midline of the transverse process. ~8mm.
3. Draw a vertical line 3 mm outside the midpoint of the lower joint, and draw a horizontal line from the upper 1/3 of the base of the transverse process, and the intersection of the two lines is the nail entry point.
4. On the intersection of the midline of the longitudinal axis of the inferior articular process and the horizontal line of the midpoint of the root of the transverse process, 1 mm below the facet;
5. In complex cases, it is a safe choice to remove part of the lamina and implant pedicle screws under direct vision.
Thoracic spine insertion angle
Sagittal plane: Decrease in pedicle inclination from T1 to T12. T1: 25°; T2: 20°; T3: 15°; T4-9: 10°; T10: 5°; T11-12: 0°.
The pedicle screws of the upper thoracic vertebrae should have an inclination angle of 10-20° with the sagittal plane, and the pedicle screws of the middle and lower thoracic vertebrae should have an inclination angle of 0-10° with the sagittal plane. Ebraheim proposed that T1 and T2 pedicle screws should be 30-40° inclination with the sagittal plane, T3-T11 should be 20-25°, and T12 should be 10°.
Horizontal plane: should be parallel to the upper and lower endplates.
Thoracic spine selection screw
![D]()
For adults, the diameter of the thoracic pedicle screw is less than 5mm, and there is a risk of screw breakage. In many cases of the mid-thoracic spine, screws larger than 5 mm in diameter cannot be placed, which may easily lead to pedicle rupture.
Some scholars use the lateral placement of the pedicle, which solves this problem very well. Click the tip of the transverse process to enter the pin, and the midline of the transverse process is horizontal. Turn a small hole first, and the direction of the awl intersects with the lateral edge of the facet joint of the vertebra. The angle with the sagittal plane is 25-40 degrees, and the degree gradually increases from T12 upward.
The inserted screw will pass through the transverse process, part of the costotransverse process, the costovertebral joint, and the lateral wall of the vertebral body. Since the screw insertion route is located outside the facet joint, it is impossible to enter the spinal canal, which is safer. In addition, the increase of the inclination angle makes the screw longer. , thicker, the fixation strength is increased, the implantation angle range is large, the screws can be located in a line, and the assembly is more convenient.
Lumbar spine
Lumbar entry point
1. Needle insertion method at the apex of the herringbone ridge (the meeting point of the accessory process ridge on the posterolateral side of the root of the superior articular process and the isthmus ridge), the variation of this position is small (the occurrence rate is 98%), and the accessory process is bitten off by positioning.
2. Intersection method: the intersection of the midline of the transverse axis of the transverse process and the longitudinal axis outside the facet joint, or the outer edge of the superior articular process,
3. In complex cases, it is a safe choice to remove part of the lamina and implant pedicle screws under direct vision.
Lumbar screw angle
Sagittal plane angle: L1-L3 have 5-10 degrees of inversion, L4-L5 have 10-15 degrees of inversion.
Horizontal plane angle: L1-4: parallel to the endplate; L5: 10 degrees of downward inclination (L5 vertebral body backward).
Lumbar spine selection screw
Surgery Precautions
1. Before surgery, there must be a clear frontal and lateral view of the lumbar spine. The anterior view shows the position of the screw in the horizontal direction, and the lateral view can indicate the position of the screw in the vertical position.
2. The entry point should be accurate and appropriately enlarged, and the cortical bone at the anchor point can be removed by the opening of the triangular pyramid or the rongeur.
3. After determining the general direction, use appropriate force to open the circuit carefully. The blunt-tip probe should not encounter obvious resistance during needle insertion. There should be no sense of "failure" or sudden resistance. When resistance is encountered in the first 5~15mm, it should be timely. Adjust the needle entry point and angle. If you encounter strong resistance, it is recommended to exit first and re-select the direction to enter. Be sure to follow the direction of the pedicle. The inside of the pedicle is cancellous bone and the outside is cortical bone, which can be relatively automatically guided, provided that the entry point is accurate and properly enlarged; Incline 10-15° to the midline, pay attention to the plane parallel to the upper edge of the vertebral body, and grasp the depth of about 3cm. Feel is important.
4. It is very important to use the pedicle probe to probe the four walls, especially the inner, lower and bottom walls.
5. When the anatomical distinction between the lower thoracic and lumbar vertebrae is unclear, bite off the accessory process and the lower articular process, and then partially bite off the upper articular process, and look directly at the inner wall of the pedicle and the entrance of the pedicle.
6. It is better to go outside than inside, go up and not go down; rotation is the main thing, and forward is the supplement; while advancing and probing, stop when you see hard, adjust in time, only use finger force, do not forcefully twist.
7. The diameter of the screw should not exceed 83% of the diameter of the outer cortex of the pedicle.
How to Buy Orthopaedic Implants and Orthopaedic Instruments?
For CZMEDITECH, we have a very complete product line of orthopedic surgery implants and corresponding instruments, the products including spine implants, intramedullary nails, trauma plate, locking plate, cranial-maxillofacial, prosthesis, power tools, external fixators, arthroscopy, veterinary care and their supporting instrument sets.
In addition, we are committed to continuously developing new products and expanding product lines, so as to meet the surgical needs of more doctors and patients, and also make our company more competitive in the whole global orthopedic implants and instruments industry.
We export worldwide, so you can contact us at email address song@orthopedic-china.com for a free quote, or send a message on WhatsApp for a quick response +86-18112515727.
If want to know more information,click CZMEDITECH to find more details.